HorizonWeb Online Support
 How do I setup a customer on HorizonWeb?
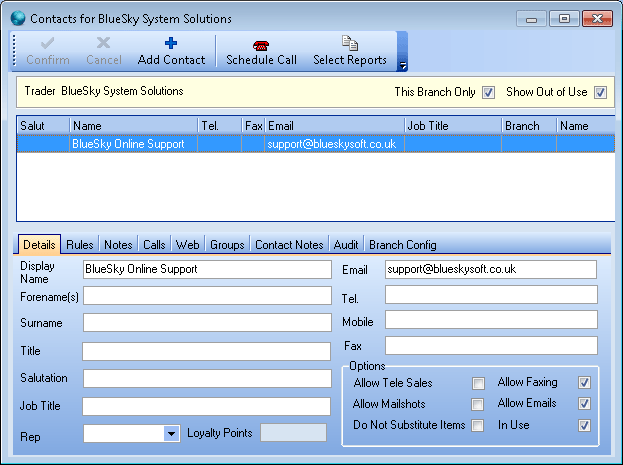
To setup a customer on HorizonWeb, you need to browse to the trader (F9) where the contact is setup and then select the  button and select the customer you wish to setup.

On the details tab you need to set an email address – This will be used for the customer to be able to login onto HorizonWeb and will also receive order confirmations to this email address.
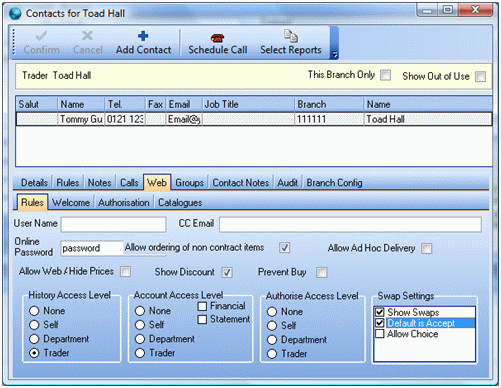
Select the Web tab, and then the rules tab. (as seen below)

- ‘Online Password’. This is needed as it will make the customers online account secure, and also without a password the customer will not be able to gain access. It is recommended that the Online Password is at least 6 characters long with 1 number and 1 uppercase character.
- ‘User Name’. This allows you to give a customer a User Name to login to HorizonWeb instead of them using their email address.
- ‘CC Email’. This allows you to be able to CC another contact into the Email confirmation that the individual Customer will receive when placing an order.
- ‘Allow Web Access’. This will allow the user to log on into your site and therefore granting them access to the online ordering system.
- ‘Allow ordering of non-contract items’. If this is not ticked then the customer will only be able to order from contracts and will not be able to browse for products.
- ‘Hide Prices’. When ticked it hides all prices on the website, except in the Shopping Cart.
- ‘Show Discount’. When ticked both the original and the discounted price are shown online.
- ‘Allow Ad Hoc Delivery’. If ticked when at checkout on HorizonWeb the user till be able to enter a Ad Hoc delivery address, if they want the goods delivering to another address instead of the ones already set up against their account.
- ‘Prevent Buy’. If ticked the user will be able to browse HorizonWeb, but will not be able to order.
Access Levels
- ‘History Access Level’
- ‘None’ – this means that the user will not be able to see their history on the accounts tab.
- ‘Self’ - this will allow the user will allow that user to view their own order history
- ‘Department’ – this will allow the user to view their default departments order history
- ‘Trader’ – this will allow the user to view all order history for their trader
- ‘Account Access Level’
- ‘None’ – this means that the user will not be able to see invoices and outstanding orders on the accounts tab.
- ‘Self’ – this will allow the user will allow that user to view their own outstanding orders.
- ‘Department’ – this will allow the user to view their default departments outstanding orders.
- ‘Trader’ – this will allow the user to view all outstanding orders for their trader.
- ‘Financial’ If this tick box is selected the user will be able to view sales invoices.
- ‘Authorise Access Level’ (Only relevant to an Authoriser)
- ‘None’ – this means that the user will not be able to see any orders awaiting authorisation.
- ‘Self’ – this will allow the user will allow that user to view their own orders awaiting authorisation.
- ‘Department’ – this will allow the user to view their default departments orders awaiting authorisation.
- ‘Trader’ – this will allow the user to view all orders awaiting authorisation for their trader.
 Back To Horizon Settings for HorizonWeb